How To Add Photos To A Wordpress Blog
A picture is worth more than 1,000 words when presented within a blog post (or page). On the web, an image could break up text, which can part the sea of text making it all more readable. An image can also help illustrate a point, and provide SEO value.

An image could find its way into image search results on a search engine. It can also, with the inclusion of keywords in its meta tags, potentially help a post rank for more keywords. Not only that, the image can be auto-thumbnailed in search results and show up when shared in Facebook or other social sites.
A search engine result with an image will attract the eye more so than one without, in most cases.
Adding Images to WP Posts the Old School Way
I'm from the old school. When I add an image I, more often than not, edit the image to be the exact dimensions that I want to work with. I use free tools like Gimp. You can use Photoshop too (if you have it).
I then, using good old fashioned FTP, upload the image to the trusty "images" folder off the root.
I then hand code the image tag in "Text" view of my WordPress post/page edit screens.
The code might look like this:
<img style="float: right; margin: 0 0 5px 10px;" title="pictre of a bat" src="https://example.com/images/pic.jpg" alt="picture of a bat" width="187" height="94" border="0" />
Let's break it down shall we:
src: this represents the path to the image. I always use the full domain here so the image shows proper in RSS feeds, etc. In only one case when working for someone else they asked that I use only /images/pic.jpg without the domain in case they link-spam the domain with their SEO and need to switch domains. Doing it this way would save them the extra work later. Doing things ethically would prevent this from being a concern, but I digress.
width/height: the dimensions to the image, I always make sure they are the "real" dimensions, not just ones to force the size of the image.
alt: this is meant to be a textual representation for the image for the visually impaired, bandwidth savers, text browser users, and search engines.
title: usually, depending on the web browser, this phrase will be shown when hovering over the image. It is supposed to provide SEO value too but I think it is overkill and overoptimization personally, so I usually leave it out.
border: out of habit I always include this, which is a value in pixels that determines the size of the border around the image. It used to be that, when linking an image, if you didn't explicitly tell all browsers NOT to include a border, then it would add a bad looking blue border. So, I got in the habit of using it. I use CSS for borders when I really want them, so I guess I'm not that old school.
style: it's probably not best practice to include styles in this manner. It's a bad habit I picked up. It is preferred to include styles within CSS sheets, and make reference to the style with a class name (or ID). WP does this elegantly when using the automated tools for including images which I will cover shortly.
The particular style I used in the above example pushes the image to the right and wraps text around it to the left. I specified that I do not want a margin at the top or right side (represented by the first two numbers), but that I wanted 5px on the bottom and 10px on the left to create some white space around the image so that it doesn't touch the text. Why different amounts? I haven't measured but it seems that there is always 5px below the image with margin space for some reason, so I just add 5 more and it always looks pretty even.
Image Sources
You have to be careful when using images on your site or blog. If they are either copyrighted or assumed copyrighted it is best to either a) not use them or b) get permission. And always cite the source of the image.
You could get images from stock photo sites (example: ShutterShock) that grant you rights to use them. morgueFile is another source, which offers a free photo archive. Be sure to read the terms.
You can always get your own images. Either download them from your digital camera or phone, or get some screenshots. There's a free Chrome browser plugin by Google that makes it easy to take screenshots. Screenshots, at least, will provide you with unique images that you can probably use in your WordPress sites. Just be careful and always cite your sources. Get permission from the respective owner when not sure. Always show respect.
Inserting Images Into WordPress Posts or Pages
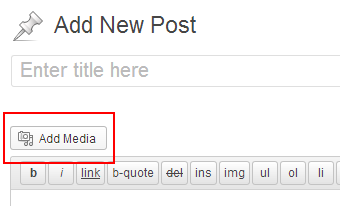
Using the Add Media within the add/edit post/page screens will give you access to the Media Library.
It will also allow you to upload images that will get auto-resized based on the set thumbnail values for the particular theme that you are working with.
You can set an image as "Featured" or insert it right within the post. When setting as Featured, the theme will have full control over placement and size, and the HTML that gets generated.
When "inserting into a post" you have a little more control. You can certainly decide where the image is placed, and you could choose from some set "classes" to decide on text wrapping, etc.
Step 1) Click the Add Media button.

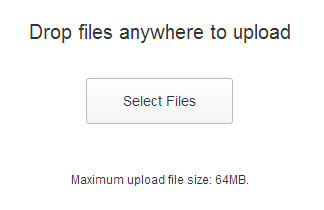
Step 2) Click the Select Files button.

Step 3) Locate the image on your computer, and click Open.
You can see the progress meter in the image slot itself, plus in the right side in the Attachment Details window.
You can click the Edit Image text link for basic cropping, and image flipping options. You can choose to have the changes applied to all of the thumbnails that were created during the upload process.
Step 4) Give the image a Title, and preferably a Caption, and Alt Text as well, for some potential SEO value. Some themes, but not many, will incorporate the Description value somehow.
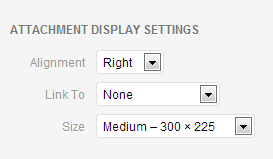
Step 5) Pick an alignment (center, left, right) or leave it as None.
Step 6) By default, the thumbnail image that gets inserted will link to the biggest version of itself (the originally uploaded file). That can be changed to link to an attachment page (some argue that will give the best chance at getting the image into Image search results, if it's worthy of being there). You can also have a link to a custom URL, or nowhere at all.
Step 7) Finally, choose one of the pre-built sizes. Most often there will be a small square, and a couple sizes that are within aspect ratio of the original, and also a Full Size option. Medium is usually the default.
When using screenshots for tutorials such as this, Full Size should be used so there is no distortion.

Step 8) Click the Insert into post button.
You will be presented with code similar to the following:

The id's and classes may be defined by the theme which will dictate how the image will ultimately look within the blog post (or page) on the site.
Some unique classes will be displayed specific to the image. They will include the image id number, 57 in the example above, which allows you to give the particular image a custom style that will not be used on other images.
Adding Featured Images Into WordPress Posts or Pages
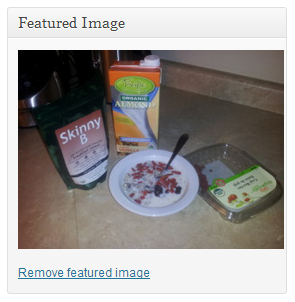
When adding a featured image, no HTML code will actually show up in the posts/pages content area. The theme will "check for" a featured image when the post is being shown and display it according to the theme's style.
Step 1) Near the bottom of the right sidebar of the post/page add/edit screens you will see the Featured Image box. Click the Set featured image text link.

Step 2) You will be presented with the Media Library by default where you can select an image and click the Set featured image button.
You can also click Upload Files near the top if the image isn't already in the library.
You can then follow the Upload steps from above, minus the "Attachment Display Settings" instructions. Then click the Set featured image button.

Uploading Other Media Files to WP
You could upload other media files like videos and audio to be included within your posts, using the Media Library functions described above.
It is often recommended however, in many cases, to have the audio and video hosted elsewhere and just embedded into your site. WordPress plugins like WP video lightbox can help you with that.
This saves on bandwidth and storage space, plus also allows you to take advantage of the in-built traffic, and the search engine love, that these media sharing sites have to offer.
YouTube and Vimeo are the top choices for video. And SoundCloud is the rising star for audio. As for images, some people will do a similar thing and upload to Flickr or Pinterest for example, then embed the content into their site.
I sometimes do that for general interest type of images (food for example), that have value on their own. Screenshots, in most cases, somehow don't qualify.
About the Author: This post was written by Keith Lock who is an author of Tips and Tricks HQ.
How To Add Photos To A Wordpress Blog
Source: https://www.tipsandtricks-hq.com/adding-images-to-your-wordpress-blog-or-website-5547
Posted by: jamescithys.blogspot.com

0 Response to "How To Add Photos To A Wordpress Blog"
Post a Comment