

How To Setup A D-link Camera Dcs-933l
IP Camera Model: D-Link DCS-5010L
Firmware version: 1.03 Firmware upgrade link to official website( http://www.dlink.com/support/)
This also utilize to D-Link DCS-933L, Firmware version :1.02
Step 1: Setup the Camera – Find the Photographic camera's IP Address
Delight refer to the manufacturer'south manual for more than detailed information.
Turn on the camera; connect the camera with a network router using an Ethernet cable.
From a PC in the same network, insert the camera'southward software CD and install the setup sorcerer. Afterwards information technology is installed, run the Setup Wizard. Yous will encounter the screen like beneath:
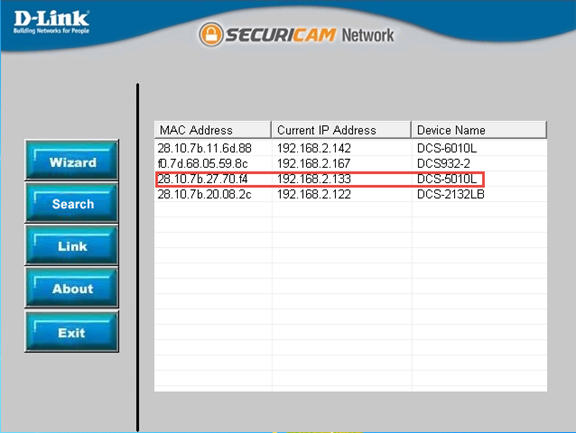
Click on "Search" to find the D-link camera in the aforementioned network.
Step 2: Configure the Camera Using the Web-based Configuration Tool
Open a web browser and access the Camera's configuration page at: http://192.168.one.133/ .
(Please supersede the IP address with the real IP address constitute using the SwannEye Search Tool), log on the configuration tool. According to the transmission, the default username is admin and the password is bare (empty).
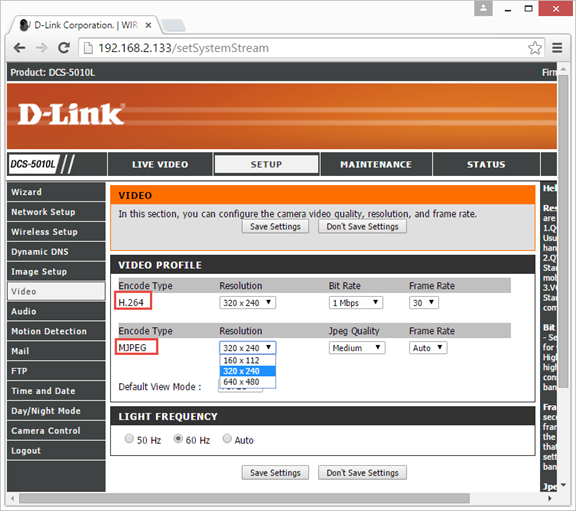
Stride three: Fix the Image Resolution
Using the camera's web-based configuration tool, click "Video", if you subscribe image plan on Cameraftp.com, please set Encode Type "MJPEG" here, it will allow you to select an image resolution. (See the screenshot higher up). Please make sure it matches your CameraFTP subscription.
For most home users or casual users, 320x240 is ok.
For better image quality, you can choose 640x480. Please note this volition increment the bandwidth and storage usage past virtually iv times. The CameraFTP subscription cost is also significantly higher.
If you subscribe video plan on Cameraftp.com, delight set Encode Blazon "H.264" hither. Please select an image resolution, and Frame Charge per unit which matches your CameraFTP subscription.
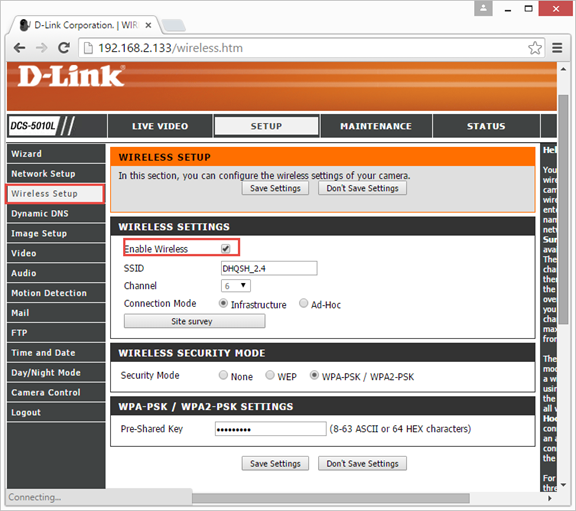
Step 4: Wireless Setup
Click on "Wireless Setup", and and so click on "Site Survey". You will find a list of Wireless Networks. Select your wireless router'due south SSID in the listing and enter the correct authentication credentials. Your camera will be connected to your wireless network.
Step 5: Setup CameraFTP Service
If y'all don't have an account on CameraFTP.com, delight visit world wide web.cameraftp.com and sign up a costless trial account. CameraFTP.com offers 3-mean solar day free trial. Afterward 3 days, y'all need to order our paid subscription to go along using the service.
Assuming you take an business relationship on CameraFTP.com, so click on the "FTP" tab on the left-hand side. You volition come across the screen below.
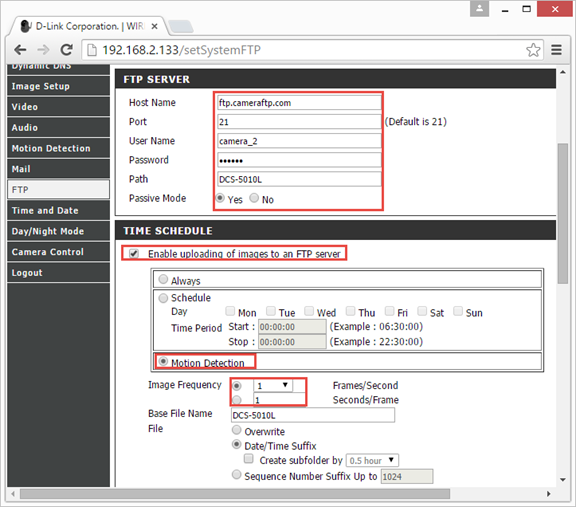
If you subscribe image programme, bank check the checkbox "Enable uploading of images to an FTP server".
Motility Detection" is recommended.
If you lot select "Always", and then delight select an upload interval that matches your CameraFTP subscription. For example, if your subscription allows a max upload frequency of 1 image / two seconds, and so select the "Image Frequency" to two Seconds/Frame. Inbound an incorrect number may get your business relationship blocked.
Please enter the following information:
- FTP service: ftp.cameraftp.com (or IP: 66.220.nine.45)
- FTP port: 21
- FTP User / Password: FTP username is your CameraFTP username, FTP password is available in Configure IP Cameras folio. (Your CameraFTP countersign may also work).
- FTP Upload Folder: /YourCameraName
- Passive Mode:
Yes. (Annotation Active FTP is often blocked by routers. Please use Passive Mode, or PASV)
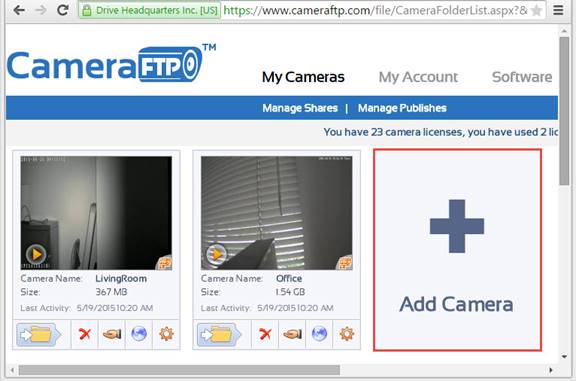
Your Camera Name is created on www.CameraFTP.com website when you add together a new camera. (Come across the screenshot below)
Click on the" Test" button to test your FTP setup.
If it is successful, congratulations, y'all are done! If non, you can click on the Status tab to find more detailed mistake information.
If you subscribe video plan on CameraFTP.com, please encounter below photo.
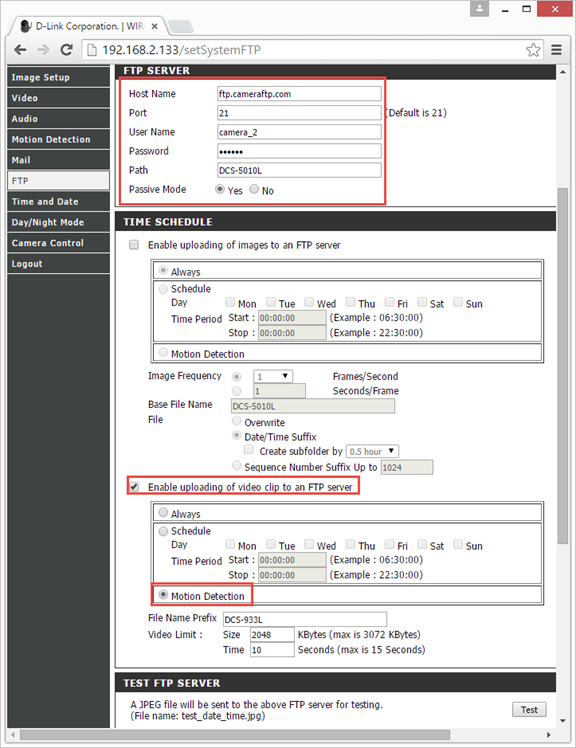
Simply check the checkbox "Enable uploading of video prune to an FTP server", Move Detection is recommended, as well.
Note: as our testing, it seems upload avi video of this IPcamera take issue to our CameraFTP server, and then images is recommended, if you subscribe video plan on CameraFTP.com, you lot besides tin choose to upload paradigm to CameraFTP server, and please select image solution (Encode Type: MJPEG referred at step three) and framerate which almost match your video plan.
Yous can visitwww.cameraftp.com to monitor or play dorsum your recorded images from anywhere.
You lot can also download CameraFTP Viewer App for iOS and Android.
Source: https://www.cameraftp.com/CameraFTP/Support/DLink5010LDCS933L.aspx
Posted by: jamescithys.blogspot.com
0 Response to "How To Setup A D-link Camera Dcs-933l"
Post a Comment